
Raft is an application framework for connected devices. In this post I’m going to go through the steps to create a connected app from scratch. The source code is available on Github – see the Releases for the code at each step if you want to follow along.
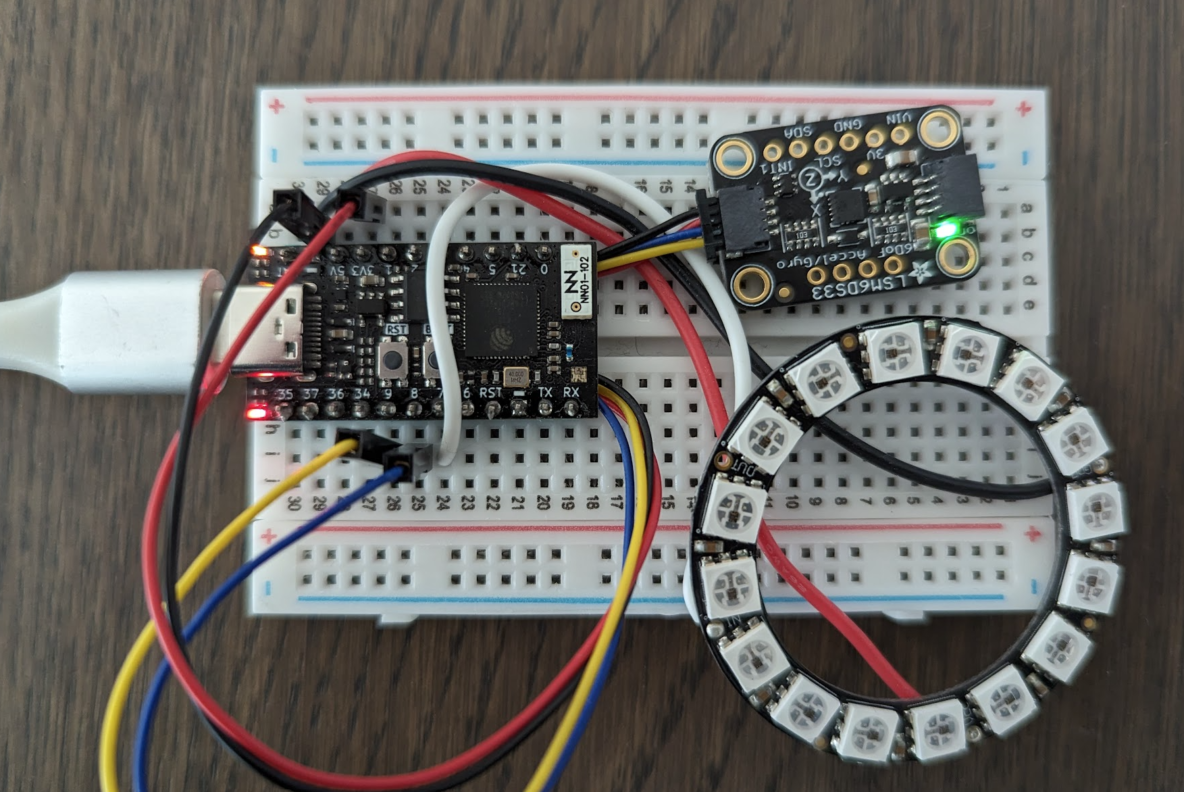
The hardware I’m going to target is based on a breadboard with some rather generic components:
- Tiny S3 ESP32-S3 development board
- A ring of Adafruit NeoPixels (16 x WS2812)
- An LSM6DS33 IMU (Accelerometer and Gyroscope 6DoF) on an Adafruit Stemma QT Breakout
- 1 pushbutton connected directly to a GPIO line (not in the photo)
- 1 Infra-Red transmitter / receiver connected to GPIO lines (not in the photo)
The goal is to create a connected device with the following capabilities:
- Bluetooth, WiFi or Serial connection
- Automatic handling of connection issues / reconnection
- Initialization and regular polling of the IMU (in fact many different IMUs are supported without change)
- API to display patterns on the NeoPixel LEDs
- Initialization and polling (or interrupt handling) of the pushbutton GPIO
- Initialization and polling (analog readings) of the infrared transmitter / receiver
- Publishing (over a publish-subscribe mechanism) of measurements from IMU, push-button and Infra-red sensor
The APIs should be accessible over any of the connected wireless or wired interfaces.
Starting a Raft Project
Creating an building Raft projects is done with a command-line program called Raft CLI. To get started
- Install rust by following these steps
- Install the raftcli with:
cargo install raftcli
- install Docker – which will handle all of the required development tools
- Create a folder for your new application and change to that folder
- Run the raftcli tool with:
raft new .
~$ mkdir RaftExampleApp
~$ cd RaftExampleApp/
~/RaftExampleApp$ raft new .
Project Name: RaftExampleApp
Project Version (e.g. 1.0.0): 1.0.0
Target Chip (e.g. esp32, esp32s3, esp32c3): esp32s3
System Type Name: SysTypeMain
ESP-IDF Version: 5.2.1
Create User SysMod: true
User SysMod Class: AppSysMod
User SysMod Name: AppSysMod
Raft Core Git Tag: main
Use Raft SysMods: true
Raft SysMods Git Tag: main
Use Raft Web Server: true
Raft Web Server Git Tag: main
Successfully generated a new raft app in: .
At each stage you are asked to confirm the default setting (by pressing Enter) or change it as required. I changed the Project Name to RaftExampleApp, selected esp32s3, Changed the System Type name to SysTypeMain and changed the User SysMod Class/Name to AppSysMod. Otherwise I accepted the defaults.
Now open the project folder in Visual Studio Code (or similar) to see the folders and files that have been created:
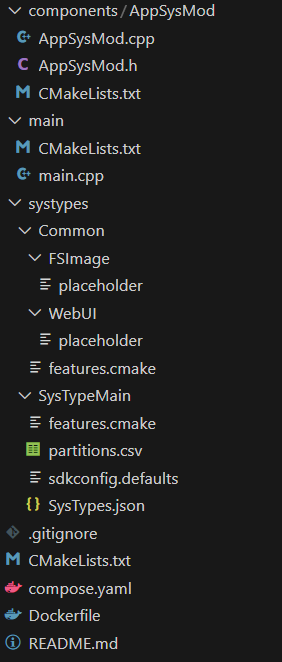
The main folders are as follows:
- components/AppSysMod – this is the location for the source code of the application SysMod. Most of the code you add will go in this folder or other folders in the components directory. Two C++ source files have been created along with a build file.
- main – this is the location of the startup functions for the app. Generally it is only necessary to change the code in this folder if you want to include additional libraries.
- systypes – Raft applications are configured using information in the systypes folder. Separating out different systypes allows targeting of different hardware, libraries, versions, etc. More than one systype can be specified and a Common folder is also present for configuration that is common to more than one systype.
- The root folder contains the main build files
Building the App
The Raft CLI is also used to build (as well as flash and monitor) the application. The simplest option is just “raft build” and this makes use of Docker as explained earlier.
~/RaftExampleApp$ raft build -cAnd you should see the build complete like this:
SysTypeMain.bin binary size 0x128a80 bytes. Smallest app partition is 0x1b0000 bytes. 0x87580 bytes (31%) free.

Project build complete. To flash, run:
 idf.py flash
or
 idf.py -p PORT flash
or
 python -m esptool --chip esp32s3 -b 460800 --before default_reset --after hard_reset write_flash --flash_mode dio --flash_size 4MB --flash_freq 80m 0x0 build/SysTypeMain/bootloader/bootloader.bin 0x8000 build/SysTypeMain/partition_table/partition-table.bin 0x1e000 build/SysTypeMain/ota_data_initial.bin 0x20000 build/SysTypeMain/SysTypeMain.bin 0x380000 build/SysTypeMain/fs.bin
or from the "/project/build/SysTypeMain" directory
 python -m esptool --chip esp32s3 -b 460800 --before default_reset --after hard_reset write_flash "@flash_args"
If you have problems then check that you have docker installed. If you don’t want to (or can’t) use docker then follow the instructions found in the Raft CLI documentation.
Flashing the Basic App
At this point you are ready to flash the basic app to the hardware. Connect the TinyS3 board via USB and:
raft run -p <serial-port>Sometimes the flashing process fails, especially on ESP32-S3 devices like the TinyS3. In case this happens, the device can be forced into “download mode” by holding down the “boot” button while pressing and releasing the reset button (while the device is powered on and connected via the USB cable).
If all goes well you should see something like:
........
Hash of data verified.

Leaving...
Hard resetting via RTS pin...

I (326) esp_image: segment 4: paddr=00139748 vaddr=4037bfI (376) cpu_start: Pro cpu start user code
I (376) cpu_start: cpu freq: 160000000 Hz
I (376) cpu_start: Application information:
I (379) cpu_start: Project name:     SysTypeMain
...
W (459) spi_flash: Detected size(8192k) larger than the size in the binary image header(4096k). Using the size in the binary image header.
...
I (483) RaftJsonNVS: nvs_flash_init() OK
I (483) sleep: Configure to isolate all GPIO pins in sleep state
I (484) sleep: Enable automatic switching of GPIO sleep configuration
I (490) main_task: Started on CPU0
I (494) main_task: Calling app_main()
I (502) SysMan: getFriendlyName SysTypeMain_4f49f2 (isSet N nvsStr  default SysTypeMain uniqueStr f412fa4f49f2)
I (508) SysMan: systemName SysTypeMain friendlyName SysTypeMain_4f49f2 (default SysTypeMain) serialNo <<NONE>> nvsNamespace system
I (519) SysMan: slowSysModThresholdUs 50000 monitorPeriodMs 10000 rebootAfterNHours 0 rebootIfDiscMins 0
I (529) RaftCoreApp: SysTypeMain 1.0.0 (built May 29 2024 15:45:59) Heap (int) 311672 (all) 311672
...
I (825) AppSysMod: Welcome to Raft!
...
I (830) WebServer: addRestAPIEndpoints added webcerts API
I (831) WebServer: setupEndpoints serverEnabled Y port 80 apiPrefix api/
I (838) SysMan: pauseWiFiForBLEConn NO
I (5844) SysMan: {"n":"SysTypeMain","v":"1.0.0","r":"","hpInt":217288,"hpMin":216632,"hpAll":217288,"NetMan":{"hostname":"SysTypeMain4f49f2","wifiSTA":{"en":1,"conn":0,"SSID":"","RSSI":0,"IP":"","MAC":"f4:12:fa:4f:49:f0","paused":0},"wifiAP":{"en":1,"SSID":"RaftAP","clients":0}},"SysMan":{"avgUs":124.21,"maxUs":509,"minUs":0,"slowUs":{"CommsMan":426,"SerialConsole":81}}}
Various sections have been removed for brevity. The message “spi_flash: Detected size(8192k) larger than the size in the binary image header(4096k). Using the size in the binary image header.” may appear – this is ok and just indicates that we aren’t maxing-out the capabilities of the device.
The message at 825ms “AppSysMod: Welcome to Raft!” comes from code in the setup() function inside the AppSysMod which is the main place that we’ll start adding code.
The final message (at time 5844ms) is a regular “heartbeat” update from the Raft system indicating the state of the device including connetivity, performance and memory availability.
Congratulations – you have a working embedded app!
What does it do?
Right now the app:
- Provides a WiFi access point with SSID “RaftAP” and password “raftpassword” (these are set in the systypes/SysTypeMain/SysTypes.json file)
- Supports a REST API which can be accessed via the serial terminal (see below for a list)
- Displays regular status messages
The basic REST API commands can be shown on the serial terminal by hitting Enter:
 getSysTypes: Get list of base system types
 getSysTypeConfiguration: Get JSON contents for a named base system type
 postsettings: Set non-volatile systype config, for system add /reboot to restart after setting the value
 getsettings: Get systype info for system, /getsettings/<filter> where filter is all, nv, base (nv indicates non-volatile) and filter can be blank for all
 clearsettings: Clear settings for system /clearsettings
 reset: Restart program
 v: Get version info
 sysmodinfo: Get sysmod info
 sysmoddebug: Get sysmod debug
 friendlyname: Friendly name for system
 serialno: Serial number
 hwrevno: HW revision
 testsetloopdelay: Set a loop delay to test resilience, e.g. ?delayMs=10&skipCount=1, applies 10ms delay to alternate loops
 sysman: Set SysMan settings, e.g. sysman?interval=2&rxBuf=10240
 espFwUpdate: Update ESP32 firmware
 reformatfs: Reformat file system e.g. /local or /local/force
 filelist: List files in folder e.g. /local/folder ... ~ for / in folder
 fileread: Read file ... name
 filedelete: Delete file e.g. /local/filename ... ~ for / in filename
 fileupload: Upload file
 w: Setup WiFi STA e.g. w/SSID/password
 wap: Setup WiFi AP e.g. wap/SSID/password
 wc: Clear WiFi settings
 wifipause: WiFi pause, wifipause/pause, wifipause/resume
 wifiscan: Scan WiFi networks - wifiscan/start - wifiscan/results
 console: console API e.g. console/settings?baud=1000000
 subscription: Subscription to published messages, see docs for details
For example to see the version info on the terminal, enter:
v ⏎
{"req":"v","rslt":"ok","SystemName":"SysTypeMain","SystemVersion":"1.0.0","SerialNo":"","MAC":"f412fa4f49f2","SysTypeVers":"","RicHwRevNo":""}
The response is a JSON string (the exact same string that would be returned if running the REST API operation over an HTTP connection).
To connect to a WiFi Access Point (or you could simply connect to app’s own access point which is called RaftAP and password raftpassword)
w/<ssid>/<password>Then you can use the REST API over HTTP using curl:
$ curl 192.168.1.23/api/v
{"req":"v","rslt":"ok","SystemName":"SysTypeMain","SystemVersion":"1.0.0","SerialNo":"","MAC":"f412fa4f49f2","SysTypeVers":"","RicHwRevNo":""}