
Having obtained data from the IMU we’ll now look at how to publish this data using the publishing mechanism built into the Raft framework. The source code is available on Github – see the Releases for the code at each step if you want to follow along.
Publishing Overview
The publish-subscribe pattern is a very widely used mechanism for message handling which enables de-coupling of “data sources” and “data sinks”. The key concept is that the publisher does not need to be hard-coded to know where to send messages because the subscription process defines this at a later point. In addition the Raft publishing mechanism abstracts the publishing entity from the data sources through a registration process so that both ends of the publish-subscribe mechanism are de-coupled.
Looking at how this works in practice, we’ll start with the data source registration.
Data source registration
To register a data source, a SysMod calls the registerDataSource() method on the SysManager object and passes two callback functions:
- a state-change detection function
- a function to get the current state in binary format
For example, the code to register a data source which provides a JSON string containing the current state (measurement values, etc) of the data source might look like this:
// Register data source (message generator and state detector functions)
getSysManager()->registerDataSource("Publish", "IMU",
        [this](const char* messageName, CommsChannelMsg& msg) {
            String statusStr = getStatusJSON();
            msg.setFromBuffer((uint8_t*)statusStr.c_str(), statusStr.length());
            return true;
        },
        [this](const char* messageName, std::vector<uint8_t>& stateHash) {
            return getStatusHash(stateHash);
        }
    );
The first parameter to registerDataSource() is “Publish” to indicate that this is a publishing registration. The second parameter “IMU” is the name of the publishing data source and we will need to use this name later in the configuration process to define the channel.
The [this](…){…} syntax in C++ is used to define an anonymous function which captures the “this” pointer so that it can be used subsequently. The first (anonymous) function handles getting the state:
- takes a messageName and CommsChannelMsg reference
- Gets the JSON status of the SysMod by calling the getStatusJSON() method (this is a method that all SysMods can implement and it overrides a base class method of RaftSysMod)
- Converts the received string into a C-style buffer (with null terminator)
- returns true to indicate that the message was created successfully (if it returned false then a publishing message would not be generated)
The second (anonymous) function handles detection of state changes, it:
- takes a messageName and a C++ dynamic array (vector) called stateHash
- it fills the stateHash array with values that represent the state of the SysMod in a manner which is specific to the SysMod
Example functions for a SysMod with a single 16-bit value
As an example let’s say that a SysMod has a single 16-bit value which represents a measurement from a sensor that it wants to publish. The code for the getStatusHash() and getStatusJSON() functions might look like this:
////////////////////////////////////////////////////////////////////////////////
/// @brief Check for change of state
/// @param stateHash hash of the current state
void MySysMod::getStatusHash(std::vector<uint8_t>& stateHash) const
{
    // Set hash to detect changes in the sensor value
    stateHash.clear();
    stateHash.push_back((_value & 0xff) ^ (_value >> 8));
}

////////////////////////////////////////////////////////////////////////////////
/// @brief Get status as JSON
/// @return JSON string
String MySysMod::getStatusJSON() const
{
    return "{ \"value\": " + String(_value) + "}";
}
To determine whether a change of state has occurred, the publisher calls the anonymous function to get a hash of the state of the SysMod in the form of a variable-length array of bytes. It is up to the developer to create a suitable hash which should be short (to avoid unnecessary storage) and quick to compute. For instance it might be appropriate to simply perform some boolean operation (like a bit-wise XOR) on the various bytes containing the state. Alternatively the state values could simply be returned in full by copying their memory image to the hash vector.
Our example function to return the JSON state simply creates a string in JSON format containing the value as a field called “value”.
Replacement functions for IMU data
Let’s now move away from the examples above and implement the code to for the actual data source which is the IMU:
////////////////////////////////////////////////////////////////////////////////
/// @brief Check for change of state
/// @param stateHash hash of the current state
void IMUSysMod::getStatusHash(std::vector<uint8_t>& stateHash) const
{
    stateHash.clear();

    // Check all buses for data
    for (RaftBus* pBus : _raftBusSystem.getBusList())
    {
        // Check bus
        if (pBus)
        {
            // Check bus status
            uint32_t identPollLastMs = pBus->getLastStatusUpdateMs(true, true);
            stateHash.push_back(identPollLastMs & 0xff);
            stateHash.push_back((identPollLastMs >> 8) & 0xff);
        }
    }
}

////////////////////////////////////////////////////////////////////////////////
/// @brief Get status as JSON
/// @return JSON string
String IMUSysMod::getStatusJSON() const
{
    String jsonStr;
    for (RaftBus* pBus : _raftBusSystem.getBusList())
    {
        if (!pBus)
            continue;
        // Get device interface
        RaftBusDevicesIF* pDevicesIF = pBus->getBusDevicesIF();
        if (!pDevicesIF)
            continue;
        String jsonRespStr = pDevicesIF->getPollResponsesJson();
        if (jsonRespStr.length() > 0)
        {
            jsonStr += (jsonStr.length() == 0 ? "{\"" : ",\"") + pBus->getBusName() + "\":" + jsonRespStr;
        }
    }
    LOG_I(MODULE_PREFIX, "getStatusJSON %s", jsonStr.c_str());

    return jsonStr.length() == 0 ? "{}" : jsonStr + "}";
}
The structure of the code is identical, it is simply a litte more complex because, in each function, it needs to iterate through the buses and get the device interface as before, then:
- in the case of the hash it calculates a 1 byte hash from the 2 byte time-stamp of the last data change event
- in the case of the JSON string, a string is built-up with sections for each bus and device.
Adding the Publishing Configuration Record
We also need to add a configuration record into the SysTypes.json file to setup the publishing operation.
    "Publish": {
        "enable": 1,
        "pubList": [
            {
                "name": "IMU",
                "trigger": "TimeOrChange",
                "msgID": "IMU",
                "rates": [
                    {
                        "if": "SerialConsole",
                        "protocol": "RICSerial",
                        "rateHz": 1.0
                    }
                ]
            }
        ]
    },
Note that the msgID must exactly correspond to the value that was passed to the registerDataSource() function.
The trigger field here is TimeOrChange. Publishing in Raft can be configured to trigger on one of the following:
- the change of state of a data source (Change)
- a time interval elapsing (TimeOnly)
- either of the above (TimeOrChange)
The contents of the “rates” array shown above is an example of defining a permanent publishing destination and this can be useful in some cases as it avoids the need for a subscription request. It is included here to publish to the SerialConsole using the RICSerial protocol (more about that later) at a rate of 1 message per second.
Running the example code
When this code is run the following might be seen:
I (12751464) IMUSysMod: getStatusJSON {"I2CA":{"0x6a@0":{"x":"925ffcff0400010011022e005d20","_o":1,"_t":"LSM6DS3"}}
ç… Ž û¢É²ÃÁ¢ºû¢°ø¶áÀ°¢ºû¢ø¢º¢¹²µææãææ°´°°°±°°±±°²²å°°µä²°¢¬¢ß±¬¢ßô¢º¢ÌÓͶÄÓ³¢ýýý±ŽçI (12751563) IMUSysMod: getStatusJSON {"I2CA":{"0x6a@0":{"x":"92c50000fdfffeff150230007b20","_o":1,"_t":"LSM6DS3"}}
ç… Ž û¢É²ÃÁ¢ºû¢°ø¶áÀ°¢ºû¢ø¢º¢¹²ãµ°°°°æäæææåææ±µ°²³°°°·â²°¢¬¢ß±¬¢ßô¢º¢ÌÓͶÄÓ³¢ýýý¾¢çWhile it might appear that something has gone wrong, the strange symbols are to be expected as they indicate characters carried with the most-signicant-bit (MSB) set – this is how the RICSerial sends data over the SerialConsole connection. The log output indicates that the JSON message generation function is being called and the rest is the result of this information being sent.
To see the information “decoded” by clearing the MSB of each character we can use a simple one-liner python script (the codes here are the ones from the first message shown above):
print(''.join(chr(ord(c) & 0x7F) for c in "ç… Ž û¢É²ÃÁ¢ºû¢°ø¶áÀ°¢ºû¢ø¢º¢¹²µææãææ°´°°°±°°±±°²²å°°µä²°¢¬¢ß±¬¢ßô¢º¢ÌÓͶÄÓ³¢ýýý±Žç"))When we run this we get:
{"I2CA":{"0x6a@0":{"x":"925ffcff0400010011022e005d20","_o":1,"_t":"LSM6DS3"}}Which is the same data as shown by the logging message.
Subscribing to published data
Now that the publishing record has been established we will look at how subscriptions work. Naturally the subscription will come from a different computer and one simple way to achieve this is to use WebSockets over WiFi.
Firstly we need to add a websocket which will communicate using JSON messages. Change the websockets entry inside the WebServer entry in SysTypes.json:
        "websockets": [
            {
                "pfix": "ws",
                "pcol": "RICSerial",
                "maxConn": 4,
                "txQueueMax": 20,
                "pingMs": 30000
            },
            {
                "pfix": "wsjson",
                "pcol": "RICJSON",
                "maxConn": 4,
                "txQueueMax": 20,
                "pingMs": 30000,
                "content": "text"
            }
        ],
We’ll also remove the automatic publishing to SerialConsole to quieten the console output:
    "Publish": {
        "enable": 1,
        "pubList": [
            {
                "name": "IMU",
                "trigger": "TimeOrChange",
                "msgID": "IMU",
                "rates": []
            }
        ]
    },
It also makes sense to comment out the LOG_I() diagnostics output in the getStatusJSON() function to reduce debugging noise.
Testing with a Subscribed Client
In order to test the ability to subscribe to published events, we’ll connect the ESP32-S3 to WiFi and we’ll create a Python script which connects to a websocket.
Connecting to WiFi
To connect the TinyPico to WiFi we can either:
- use the Access Point (AP) setup in the SysTypes.json (SSID is RaftAP and password is raftpassword). In this case connect to that AP from your computer or tablet.
- connect the device to your own WiFi network by typing the following into the diagnostic terminal window “w/<SSID>/<password>” where SSID is your WiFi SSID and password is your WiFi password
In either of these cases, take a look at the output in the diagnostics terminal to find the IP address of the ESP32-S3 (which is referred to below as DEVICE_IP_ADDRESS in the python code below).
Connecting with a Python WebSocket Client
To run the python example code below you will need to install the relevant python packages:
pip3 install websocket-client
pip3 install rel
On Windows use pip instead of pip3.
The following code is lightly modified from the example code on the websocket-client home page.
import websocket, rel, json

DEVICE_IP_ADDRESS = "192.168.1.23"

def on_message(ws, message):
    print(message)

def on_error(ws, error):
    print(error)

def on_close(ws, close_status_code, close_msg):
    print("### closed ###")

def on_open(ws):
    # Subscribe to messages
    subscribe_topic = "IMU"
    subscribe_cmd = {
        "cmdName": "subscription",
        "action": "update",
        "pubRecs": [
            {"name": subscribe_topic, "msgID": subscribe_topic, "trigger": "timeorchange", "rateHz": 0.1},
        ]
    }
    print("Opened connection - subscribing to messages with ", json.dumps(subscribe_cmd))
    ws.send(json.dumps(subscribe_cmd))

if __name__ == "__main__":
    # websocket.enableTrace(True)
    ws = websocket.WebSocketApp("ws://" + DEVICE_IP_ADDRESS + "/wsjson",
                on_open=on_open, on_message=on_message, on_error=on_error, on_close=on_close)
    ws.run_forever(dispatcher=rel, reconnect=5)
    rel.signal(2, rel.abort)
    rel.dispatch()
A few points of explanation:
- The line ws = websocket.WebSocketApp(…) creates the websocket and connects to the device at the IP address defined in DEVICE_IP_ADDRESS
- The wsjson websocket is used so the payload will be pure JSON (RICJSON protocol)
- The on_open event handler on_open() is responsible for subscribing to the published messages by sending a JSON command message. This message has:
- cmdName field set to “subscription”
- action field set to “update”
- pubRecs field set to {“name”: subscribe_topic, “msgID”: subscribe_topic, “trigger”: “timeorchange”, “rateHz”: 0.1}
- The subscription command pubRecs field has the same format as one entry in the pubList array. What is actualy happening is that the pubList entry for “IMU” is being updated to add an entry in the “rates” array which references this interface (communications channel), sets to trigger publishing on time or change, and sets the publishing rate to 0.1Hz.
- The websocket.enableTrace(True) line can be uncommented to see details of websocket activity
The output from the Python program is shown below:
Opened connection - subscribing to messages with  {"cmdName": "subscription", "action": "update", "pubRecs": [{"name": "IMU", "msgID": "IMU", "trigger": "timeorchange", "rateHz": 0.1}]}
{"I2CA":{"0x6a@0":{"x":"d52fffffffff00002c013b005c20d597feff0200010032013b005a20d5fcfdff0400020037013e005320d661ffff0400000024013a005a20d6c6faff040004002c013a004820d72ffeff000001002a0143006220d7940100fcffffff320144005120d7f8feff010000003d013f006720d85dfffffcff00003e0141003420d8c50100f9fffcff350144005a20","_o":1,"_t":"LSM6DS3"}}}
{"I2CA":{"0x6a@0":{"x":"d92a0100fffffeff320154006e20","_o":1,"_t":"LSM6DS3"}}}
{"I2CA":{"0x6a@0":{"x":"d990fdff00000100320153006b20","_o":1,"_t":"LSM6DS3"}}}
{"I2CA":{"0x6a@0":{"x":"d9f5ffff0200ffff2d0147005f20","_o":1,"_t":"LSM6DS3"}}}
After the message indicating that the connection is open (and showing the subscription command), the published data is shown.
You may notice that the first message is longer than the others, this is because we set the IMU is sampled 10 times per second and records the last 10 samples (this is set in the DeviceTypeRecords.json file in the RaftI2C library). So the first message includes all of the last 10 samples recorded. From then on we are give data whenever a change occurs so each subsequent message contains one sample.
As before this data isn’t decoded at this point and we would need to run python code to decode the data.
Decoding the data using dedicated Python code
For now we’ll simply decode the data using Python code which is written specifically for this device. Later in the series we’ll look at getting the attribute schema from the device so that decoding can be made a little smarter.
import websocket, rel, json, struct

DEVICE_IP_ADDRESS = "192.168.1.23"

current_time_offset_ms = 0
last_time_stamp_ms = 0

def chunk_string(string, length):
    return (string[0+i:length+i] for i in range(0, len(string), length))

def decode_message(message):
    global last_time_stamp_ms
    global current_time_offset_ms

    # Message is JSON
    message_dict = json.loads(message)
    # Iterate over buses and devices
    for bus in message_dict:
        for device in message_dict[bus]:
            # Get the hex message data (may contain multiple samples)
            hex_data = message_dict[bus][device]["x"]
            # Split based on message length
            hex_samples_and_ts = chunk_string(hex_data, 28)
            for hex_sample_and_ts in hex_samples_and_ts:
                # Bytes from hex
                bytes_sample_and_ts = bytes.fromhex(hex_sample_and_ts)
                # Extract timestamp using struct
                time_stamp_wrapped_ms = struct.unpack(">H", bytes_sample_and_ts[:2])[0]
                # Unwrap the timestamp
                if time_stamp_wrapped_ms < last_time_stamp_ms:
                    current_time_offset_ms += 65536
                last_time_stamp_ms = time_stamp_wrapped_ms
                time_stamp_ms = current_time_offset_ms + time_stamp_wrapped_ms
                # Extract the samples using struct
                gyro_x, gyro_y, gyro_z, acc_x, acc_y, acc_z = struct.unpack("<hhhhhh", bytes_sample_and_ts[2:])
                # Form the decoded string
                decoded_string = f"Gyro(dps): ({gyro_x/16.384:.2f}, {gyro_y/16.384:.2f}, {gyro_z/16.384:.2f}), Acc(g): ({acc_x/8192:.2f}, {acc_y/8192:.2f}, {acc_z/8192:.2f})"
                print(f"Time: {time_stamp_ms}, {decoded_string}")

def on_message(ws, message):
    decode_message(message)

def on_error(ws, error):
    print(error)

def on_close(ws, close_status_code, close_msg):
    print("### closed ###")

def on_open(ws):
    # Subscribe to messages
    subscribe_topic = "IMU"
    subscribe_cmd = {
        "cmdName": "subscription",
        "action": "update",
        "pubRecs": [
            {"name": subscribe_topic, "msgID": subscribe_topic, "trigger": "timeorchange", "rateHz": 0.1},
        ]
    }
    print("Opened connection - subscribing to messages with ", json.dumps(subscribe_cmd))
    ws.send(json.dumps(subscribe_cmd))

if __name__ == "__main__":
    # websocket.enableTrace(True)
    ws = websocket.WebSocketApp("ws://" + DEVICE_IP_ADDRESS + "/wsjson",
                on_open=on_open, on_message=on_message, on_error=on_error, on_close=on_close)
    ws.run_forever(dispatcher=rel, reconnect=5)
    rel.signal(2, rel.abort)
    rel.dispatch()
The new code is in the decodeMessage() function:
- The JSON obtained via the websocket may include multiple devices (if they are attached) and even multiple buses so we iterate over those
- Each “x” record may contain multiple samples (with their own timestamps) so we split the “x” string on the known length of the sample+ts record. This is hard-coded to 28 hex characters here and in a later post we’ll look at obtaining and using the attribute schema to make this more dynamic.
- The first 2 bytes of the sample+ts are the time stamp in milliseconds but it will wrap around (after 65.536 seconds) so we need to unwrap it by remembering the last timestamp and looking for time apparently moving backwards
- The remaining 12 bytes of the sample are in the raw format that came from the IMU and they are in the order: GyroX, GyroY, GyroZ, AccX, AccY, AccZ
- These values are converted by dividing the Gyro numbers by 16.384 (to put the value in degrees per second) and the Acc numbers by 8192 (to put the values in g)
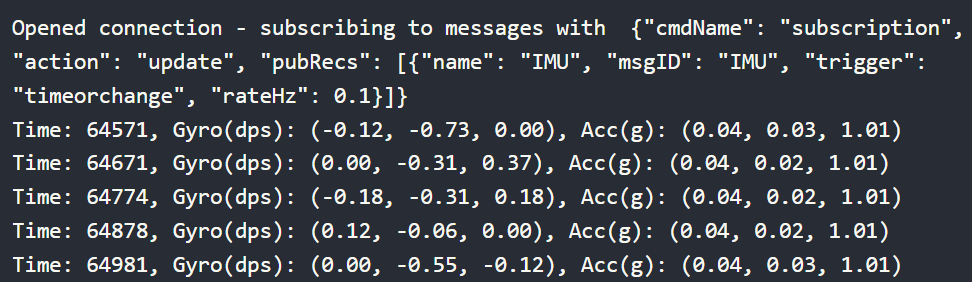
The final output looks like this:
Opened connection - subscribing to messages with  {"cmdName": "subscription", "action": "update", "pubRecs": [{"name": "IMU", "msgID": "IMU", "trigger": "timeorchange", "rateHz": 0.1}]}
Time: 64571, Gyro(dps): (-0.12, -0.73, 0.00), Acc(g): (0.04, 0.03, 1.01)
Time: 64671, Gyro(dps): (0.00, -0.31, 0.37), Acc(g): (0.04, 0.02, 1.01)
Time: 64774, Gyro(dps): (-0.18, -0.31, 0.18), Acc(g): (0.04, 0.02, 1.01)
Time: 64878, Gyro(dps): (0.12, -0.06, 0.00), Acc(g): (0.04, 0.02, 1.01)
Time: 64981, Gyro(dps): (0.00, -0.55, -0.12), Acc(g): (0.04, 0.03, 1.01)
Time: 65083, Gyro(dps): (0.18, -0.73, 0.00), Acc(g): (0.05, 0.02, 1.01)
Time: 65184, Gyro(dps): (-0.12, -0.67, 0.31), Acc(g): (0.04, 0.02, 1.01)
Time: 65291, Gyro(dps): (0.06, -0.92, 0.18), Acc(g): (0.04, 0.02, 1.01)
Time: 65398, Gyro(dps): (-0.12, -0.43, 0.12), Acc(g): (0.04, 0.03, 1.01)
Time: 65503, Gyro(dps): (0.00, -0.55, 0.24), Acc(g): (0.04, 0.02, 1.01)
Time: 65607, Gyro(dps): (-0.06, -0.43, 0.12), Acc(g): (0.04, 0.03, 1.01)
Time: 65711, Gyro(dps): (0.12, -0.37, 0.00), Acc(g): (0.04, 0.03, 1.01)
Time: 65817, Gyro(dps): (-0.12, 0.43, -0.12), Acc(g): (0.05, 0.03, 1.01)