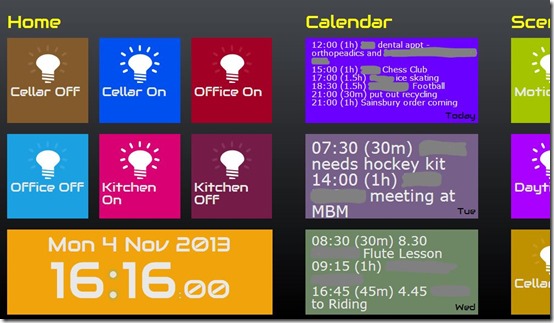
The first Android tablet app I did for the wall tablets in the house looked like this.
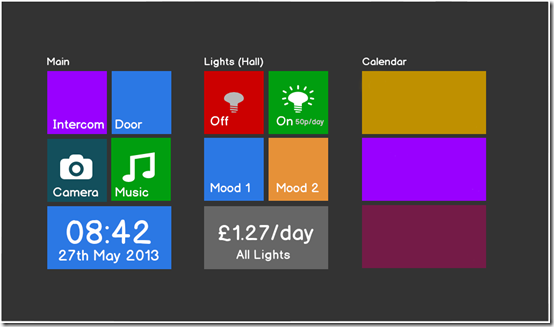
I’ve been planning a more fully featured app and put together a mock-up a while ago to focus my thoughts. I really wanted something that looked simple and clean and ended up quite liking the coloured blocky approach you tend to see on computerised cash-registers in bars and cafes – that also bears a striking resemblance to the Windows 8 UI. I was envisaging something like this.
As I mentioned in a previous post I really wasn’t looking forward to diving back into native Android app development again. So I looked at PhoneGap and got hooked on the idea of building a fully dynamic app in HTML5.
The current version (source code here) looks like this.
a fully dynamic web app
I found a framework for developing windows 8 style UIs on HTML5 but found it very feature heavy and quite hard to understand. There are other frameworks but they all seem quite bulky. So I decided to see how hard it could be to develop my own with the basic idea that the code structure would follow as closely as possible the UI requirements (since no data management is needed).
A big problem in getting things to work fluidly in HTML is the lack of programmability of CSS. I looked at frameworks like SkelJS but as far as I can see they handle CSS by switching between difference CSS files based on the platform. I really wanted to change the CSS programmatically in the same code that handles other UI changes like orientation and realised that this could be achieved with LESS – which I have used a little – but ended up coding CSS changes into CoffeeScript along with the rest of the logic.
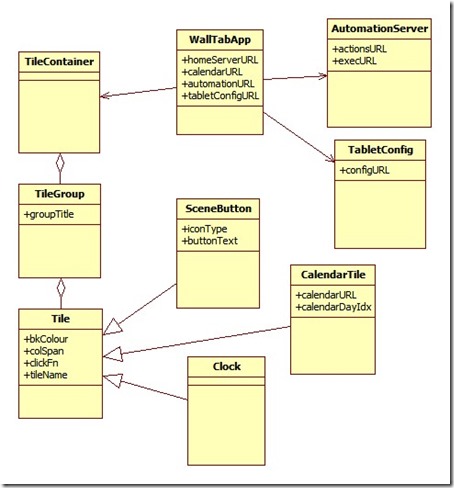
The structure I’ve ended up with is:
inheriting tile behaviour
Each tile in the UI is potentially a button and can provide some live data – a much simplified form of Windows 8 UI. I found CoffeeScript to be extremely succinct in expressing simple inheritance relationships.
class Tile
	constructor: (@bkCol, @colSpan, @clickFn, @clickP, @tileName) ->
		@contentFontScaling = 1

	addToDoc: ->
		@parentTag = "#sqTileContainer"
		@tileId = "sqTile" + @tileIdx
		$(@parentTag).append """
			<a class="sqTile" id="#{@tileId}"
			      href="javascript:void(0);"
			      style="background-color:#{@bkCol};">
			  <div class="sqInner">
			  </div>
			</a>
			"""
		if @clickFn?
			$("##{@tileId}").click =>
				(@clickFn) @clickP
		@contents = $("##{@tileId}>.sqInner")

	setPositionCss: (posX, posY, sizeX, sizeY, fontScaling) ->
		$('#'+@tileId).css {
			"margin-left": posX + "px",
			"margin-top": posY + "px",
			"width": sizeX + "px",
			"height": sizeY + "px",
			"font-size": (fontScaling * @contentFontScaling) + "%"
			}
Absolute positioning is used to layout the tiles with the left and top margins, width and height being set explicitly in javascript. The simplest derived class is the clock. This adds content to the inner div of the tile (div.sqInner) to display an animated digital clock.
class Clock extends Tile
	constructor: (bkColour, colSpan, clickFn, clickParam, tileName) ->
		super bkColour, colSpan, clickFn, clickParam, tileName

	addToDoc: (elemToAddTo) ->
		super()
		@contents.append """
			<div class="sqClockDow"></div>
			<div class="sqClockDayMonthYear"></div>
			<ul class="sqClockTime">
				<li class="sqClockHours">4</li>
				<li class="sqClockPoint1">:</li>
				<li class="sqClockMins"></li>
				<li class="sqClockPoint2">:</li>
				<li class="sqClockSecs"></li>
			</ul>
			"""
		cssTag = "sqInner"
		shortDayNames = ["Sun", "Mon", "Tue", "Wed", "Thu", "Fri", "Sat"]
		shortMonthNames = ["Jan", "Feb", "Mar", "Apr", "May", "Jun", "Jul", "Aug", "Sep", "Oct", "Nov", "Dec"]
		setInterval =>
			dt = new Date()
			# $("."+cssTag+" .sqClockDow").html dayNames[dt.getDay()]
			$('#'+@tileId+" .sqClockDayMonthYear").html shortDayNames[dt.getDay()] + " " + dt.getDate() + " " + shortMonthNames[dt.getMonth()] + " " + dt.getFullYear()
			$('#'+@tileId+" .sqClockHours").html (if dt.getHours() < 10 then "0" else "") + dt.getHours()
			$('#'+@tileId+" .sqClockMins").html (if dt.getMinutes() < 10 then "0" else "") + dt.getMinutes()
			$('#'+@tileId+" .sqClockSecs").html (if dt.getSeconds() < 10 then "0" else "") + dt.getSeconds()
		, 1000
The clock animation is borrowed from here with thanks.
laying out tiles
The tile container does most of the work calculating the layout. The algorithm for dealing with larger tiles (those that span more than one column) is pretty simple:
- I sort the tiles into size order with the single tiles first and the wider ones later.
- I estimate the number of columns needed for a group of tiles by calculating the total area of tiles and adjusting if there are wide tiles in the group that otherwise wouldn’t be accommodated (note that the algorithm I use might get it wrong if there are many 2 and 3 column tiles and few single ones but I don’t anticipate that scenario in my application).
- I fill the tile grid for the group working across each row and then downwards so the top row(s) should be filled with smaller tiles and the larger ones placed lower down.
This code is in the tile-group.coffee file.
home automation server access
The primary job of the app is to control lighting and other home automation activities. I currently have two home automation servers as I’m transitioning from Vera 3 to Indigo – the reasons for the transition I will try to explain at some other time. The reason for doing it gradually is really the amount of work involved as I have over 100 Z-Wave devices in the house (mainly dimmers and relay-switches but also PIR sensors, thermostats and TRVs). To achieve this I read the “action-groups” or “scenes” from the home automation server and populate the tiles in the tablet UI with “scene-buttons” each one having a label such as “Office On” or “Hall Mood”. These are then buttons which, when touched, cause a command to be sent back to the home automation server to get it to take the required action.
My initial take on this was to access the home server directly from the tablet. This got me into the mire of cross-domain requests and my previous wailing blog post. Eventually I did get that approach working and was moderately happy with it.
But around this time my friend Andy Chitty came around and suggested that it would be easier to update the app if it was hosted on a server rather than resident on the tablets. I wasn’t in favour of this idea initially but after some thought, and having already gotten the software working well stand-alone, I realised that he was probably right. So I found a way to achieve this using PhoneGap with an external URL for the index.html file and built an intermediate server to handle all requests to the home automation servers. I’m going to write something about the intermediate server sometime as I’m finding this is a good way to remind myself about what I’ve done – I’ve already referred to my earlier blog posts when I wanted to remember how something worked.
calendar access
Getting access to calendar information was easier than I’d expected as my calendar is on Office 365 and there is a way to publish it via a URL. The only problem with this is that the format for the received data is iCal which is pretty horrible to parse. Fortunately now that I’ve moved to having an intermediate server the problem can be moved to there and there are at least a couple of passable Python libraries for handling iCal so I’ve used those. The end result is that the code for the calendar tile is very simple.
class CalendarTile extends Tile
	constructor: (bkColour, colSpan, clickFn, clickParam, tileName, @calendarURL, @calDayIndex) ->
		super bkColour, colSpan, clickFn, clickParam, tileName
		@shortDayNames = ["Sun", "Mon", "Tue", "Wed", "Thu", "Fri", "Sat"]
		@calLineCount = 0; @calCharCount = 0; @calMaxLineLen = 0

	addToDoc: (elemToAddTo) ->
		super()
		cssTag = "sqInner"
		@requestCalUpdate()
		setInterval =>
			@requestCalUpdate()
		, 600000

	requestCalUpdate: ->
		$.ajax @calendarURL,
		type: "GET"
		dataType: "text"
		crossDomain: true
		success: (data, textStatus, jqXHR) =>
			jsonText = jqXHR.responseText
			jsonData = $.parseJSON(jsonText)
			@showCalendar(jsonData)

	showCalendar: (jsonData) ->
		if not ("calEvents" of jsonData)
			return
		newHtml = ""

		# Calendar boxes can be for each of the next few days
		# so see which date this one is for
		...
I’ve only included the part here which gets the calendar updates. The rest is a little longer since it attempts to set the font size optimally for the size of the box – I find this helps as I sometimes don’t need reading glasses to read the calendar entry – at least if there aren’t too many things going on in a day!
configuration
The final use of the intermediate server is to store the configuration information for each room. Currently this just sets a few “scene-button” tiles to be in the left-most group on the screen so they are easily accessible. So, for instance, in the kitchen the config file looks like this:
{
	"Kitchen On": "group1",
	"Kitchen Off": "group1"
}
To avoid having each tablet identify themselves to the server I currently use the IP address of the tablet to access the configuration. I’m not sure how well this will work over time as the tablets are using DHCP for their IP addresses and they may be subject to change I guess.


